Using Greeting Cards to Motivate Students and Enhance Literacy Skills
- Preview |
- Standards |
- Resources & Preparation |
- Instructional Plan |
- Related Resources |
- Comments
Overview
This lesson, which is most appropriate for first- and second-grade students, focuses on using greeting cards as a unit of study. You can use the study of greeting cards to build motivation to read and write, practice reading fluency, and attend to print concepts. This experience allows students to study the crafting techniques authors use when they create greeting cards. After exploring various greeting cards, students have the opportunity to create greeting cards and share them with other students.
Common Core Standards
This resource has been aligned to the Common Core State Standards for states in which they have been adopted. If a state does not appear in the drop-down, CCSS alignments are forthcoming.
State Standards
This lesson has been aligned to standards in the following states. If a state does not appear in the drop-down, standard alignments are not currently available for that state.
NCTE/IRA National Standards for the English Language Arts
- 1. Students read a wide range of print and nonprint texts to build an understanding of texts, of themselves, and of the cultures of the United States and the world; to acquire new information; to respond to the needs and demands of society and the workplace; and for personal fulfillment. Among these texts are fiction and nonfiction, classic and contemporary works.
- 3. Students apply a wide range of strategies to comprehend, interpret, evaluate, and appreciate texts. They draw on their prior experience, their interactions with other readers and writers, their knowledge of word meaning and of other texts, their word identification strategies, and their understanding of textual features (e.g., sound-letter correspondence, sentence structure, context, graphics).
- 4. Students adjust their use of spoken, written, and visual language (e.g., conventions, style, vocabulary) to communicate effectively with a variety of audiences and for different purposes.
- 5. Students employ a wide range of strategies as they write and use different writing process elements appropriately to communicate with different audiences for a variety of purposes.
- 6. Students apply knowledge of language structure, language conventions (e.g., spelling and punctuation), media techniques, figurative language, and genre to create, critique, and discuss print and nonprint texts.
- 11. Students participate as knowledgeable, reflective, creative, and critical members of a variety of literacy communities.
- 12. Students use spoken, written, and visual language to accomplish their own purposes (e.g., for learning, enjoyment, persuasion, and the exchange of information).
Materials and Technology
- Chart paper
- Collection of various greeting cards
- Large manila envelopes
- Construction paper (assorted colors)
- Scissors and glue
- Markers, crayons, or colored pencils
- Embellishments (e.g., foam cutouts, assorted die cuts)
Printouts
Websites
Preparation
| 1. | Visit the Postcard and Greeting Card Museum to review pictures and the history of greeting cards and Peacock Cards For Kids to view some sample cards. You may want to bookmark these websites to show students later if they have never before been to a greeting card store (see Session 3). If you do not have classroom computers with Internet access, reserve a session in your school's computer lab. |
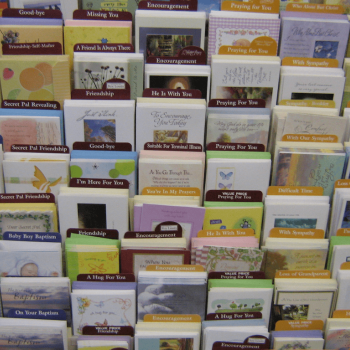
| 2. | Gather an assortment of greeting cards. Choose cards that are appropriate for your students' level of word knowledge. For example, gather some cards with limited text and basic vocabulary so that English-language learners (ELLs) and struggling readers will have material they feel comfortable exploring. Additionally, include various holiday and special message cards that will appeal to different students. If time allows, visit a card store and ask the manager if they have any envelopes that they could donate to your classroom. Many stores discard extra and unmatched envelopes. |
| 3. | Determine the number of small groups into which your students will be divided. Students can be grouped heterogeneously since you will have a variety of cards that appeal to various ability levels, genders, and interests. You will want to make sure that there is a student who can read independently in each group so that more complex cards can be shared with the rest of the group. Then, number the greeting cards and divide them evenly among large manila envelopes to use during exploration. Be sure to consider all ability levels when you are dividing the cards and write the greeting card numbers on the large envelope so that they are easy to identify in later sessions. |
| 4. | Label two pieces of chart paper-one with the heading Types of Greeting Cards and the other with Writing a Greeting Card-for use in Session 1. |
| 5. | Print and review the sample Greeting Card Scavenger Hunt. This scavenger hunt contains eight student tasks. The scavenger hunt should be used to review various print concepts. Please note that this generic scavenger hunt may need to be tailored to relate to the greeting cards that you gathered. Additionally, you may want to adapt the scavenger hunt to focus on only one literacy skill, depending on your students' needs and abilities. |
| 6. | Print and review the Creating a Greeting Card worksheet. Make a poster listing these questions for students to consider when creating their greeting cards. You may also want to make photocopies to hand out for discussion purposes. |
| 7. | Gather the art supplies listed in the Classroom Resources. You may want to make your own greeting card as a model. |
Student Objectives
Students will
- Analyze greeting cards to establish a purpose for writing a message
- Describe qualities of greeting cards that they find appealing to recognize different styles of writing
- Attend closely to print to apply what they know about letter"“sound relationships, sentence construction, language structure, and language conventions
- Apply what they have learned to write and illustrate a greeting card
- Adjust their spoken language to deliver a message
Session 1: Introduction to Greeting Cards/Building Background
Before beginning this session, students should be familiar with the concept of sorting items into categories based on how they are the same.
| 1. | Set the purpose for the lesson by explaining that people send greeting cards for many reasons. Share a greeting card that was sent to you with the class. Describe how you felt when it arrived in the mail, who it was from, and why they sent it to you. Ask students to share their experiences with greeting cards. Have they ever sent or received a greeting card? Why do people send cards? Where do people buy cards? |
| 2. | Choose a few greeting cards to share with students. Read aloud the greeting cards, modeling appropriate expression, and discuss why someone would choose to send this type of card to a family member or friend. |
| 3. | Ask students to think again about times they have sent or received a card and have them share what the occasion was. Begin writing a list on the Types of Greeting Cards chart you created (see Preparation, Step 4). |
| 4. | Explain to students that they are going to spend time exploring different types of greeting cards. Set the purpose for the first investigation by asking students to explore the greeting cards. As students look at the cards, tell them that they need to be thinking about how to sort the cards into categories determined by the group. |
| 5. | Have students get into the small groups you have assigned (see Preparation, Step 3) and give them time to sort the cards. You should circulate among the groups at this time to guide and assist them with the sorting task. You may want to present students with predetermined groupings of cards, such as rhyming cards, cards that use cartoon characters, and so on. Or you can keep it as an open sort and see what grouping categories your students create. |
| 6. | Gather students back together as a whole group and discuss their findings. Use this time to draw attention to the techniques authors use when creating greeting cards. Explain to students that some authors use jokes in their cards, while others may use rhyme to convey a message. Reiterate that the authors' style depends on the type and occasion of the message they want to send. For example, greeting card authors often use words and illustrations that have a theme. You may encounter a card that says, "Jumpin' at the chance to say-Hope you have a happy day!" The card would be illustrated with jumping frogs. This fun card is appropriate for a young child's birthday. As students discuss their findings, add ideas to the Writing a Greeting Card chart you created (see Preparation, Step 4). |
| 7. | Allow students time to share their favorite greeting cards and explain why they especially liked each one. Point out aspects that the authors used to appeal to various audiences. For example, some greeting cards use onomatopoeia, or words that imitate the sound they are describing. A card with a bee on the front might say "buzz" or a card with a cow might say "moo." |
| 8. | Hang the two charts you created where students can see them for use in future sessions. |
Session 2: Greeting Card Scavenger Hunt
| 1. | Explain to students that they will participate in a scavenger hunt. This time, rather than focusing on the authors' messages, they will focus on the individual words and print concepts presented in the cards. |
| 2. | Divide students into the same small groups created in Session 1 and distribute the greeting card envelopes. If your students can read independently, you may want to revise the sample Greeting Card Scavenger Hunt so that it can be distributed to students to work in the small groups. Otherwise, you will lead the scavenger hunt. |
| 3. | Allow students time to preview the cards that they will use for the scavenger hunt. Circulate to help students read cards if necessary. |
| 4. | Read aloud the first task from the Greeting Card Scavenger Hunt or your revised scavenger hunt worksheet (see Preparation, Step 5). Set a timer for three to four minutes and allow students some time to search their greeting cards for the focus concept. |
| 5. | When the timer goes off, each group should share their findings. Combine all student responses on a class chart. For example, if you are using the Greeting Card Scavenger Hunt worksheet provided, Task #3 directs students to find as many pairs of rhyming words as they can. Invite students to write their rhyming pairs on the chart paper themselves. This strategy will reinforce the concepts and provide students with the opportunity to write through a shared writing approach. |
| 6. | Repeat this procedure with the other tasks on the Greeting Card Scavenger Hunt worksheet. Make certain to discuss the letter-sound features that you feel are important to this word study activity. For example, when students write the rhyming pairs of words on the chart paper, follow up with a question such as, "What part of these words rhyme? Underline the rhyming part of the words." |
| 7. | Conclude the scavenger hunt by telling students that you are proud of their word study skills. Greeting card authors need to not only focus on the special message they want to send, but also use proper spelling and writing skills. |
| 8. | Display the charts in the classroom where students can see them for use in future sessions. |
Session 3: Creating Greeting Cards
| 1. | Explain to students that they will now have the opportunity to use some of the techniques they have learned in the last two sessions to create their own greeting cards. |
| 2. | Review the Creating a Greeting Card worksheet with students. Go over each point on the worksheet in detail so that students can establish a purpose for writing. They will write a message and create a greeting card displaying the message. |
| 3. | If computers are available in the classroom or school computer lab, help students to preview the Postcard and Greeting Card Museum and Peacock Cards For Kids websites to gather ideas for their own cards. |
| 4. | Instruct students to create a draft of the card they would like to make, based on the Creating a Greeting Card worksheet and examples of the cards they have seen. |
| 5. | Circulate among students to conference with them about their greeting cards and coach them with their creations as necessary. |
| 6. | Help students to proofread and revise their cards. Once the text is ready, students will create their final card using the art supplies you have assembled. You might display your own card as a model, and describe to students how you created it. |
| 7. | Display the completed greeting cards in the classroom for students to view. |
Session 4: Sharing Greeting Cards/Reading With Fluency
| 1. | Encourage students to practice reading their cards in a manner that is appropriate to the message they are sending. This will help to build their oral reading fluency. |
| 2. | Allow students enough time to share their greeting cards with their peers. This will allow students to see diverse messages and other creative approaches to creating a greeting card. |
| 3. | Model for students how to provide positive feedback to their peers about each greeting card shared. You may want to allow each student to discuss his or her greeting card in a presentation. |
Extensions
- Create a bulletin board titled Greetings From Class _____! Display students' greeting card creations and other examples of greeting cards.
- Set up a post office in the classroom. Teach a lesson on addressing an envelope and allow students to continue creating greeting cards at a writing center. Assign your class a fictitious mailing address and create an address for the other classes and key people in the school building. Assign a student the job of "mail carrier." Teach students how to sort the mail by address and deliver the mail to the people in the school. When students want to send something to someone in the school, they can place their addressed cards in the classroom mailbox.
- Teach students how to send electronic greeting cards on the Internet using Peacock Cards For Kids. Have students explore the differences between sending an e-card versus a paper card.
Student Assessment / Reflections
- Informally assess students’ abilities to name the purpose of the greeting cards that were explored through observation of discussions during Sessions 1 and 2.
- Collect the Greeting Card Scavenger Hunt and informally assess students’ abilities to attend to print and tell what they know about letter–sound relationships, sentence construction, language structure, and language conventions.
- Informally assess students’ abilities to read their greeting cards with appropriate expression during Session 4.
- Assess students’ greeting cards using the four-point Greeting Card Evaluation.