Students as Creators: Exploring Multimedia
- Preview |
- Standards |
- Resources & Preparation |
- Instructional Plan |
- Related Resources |
- Comments
Overview
This lesson introduces students to the genre of multimedia presentations. Working first as a class and then in small groups, students view and analyze sample multimedia presentations and develop a list of characteristics of the genre. Students then brainstorm programs and tools they could use to make their own multimedia presentations and review applicable copyright law. Finally, they plan, storyboard, and create their own multimedia presentations. The lesson stresses the importance of using media in compliance with copyright protection and provides information about various multimedia formats. The topic and format of the presentations are left open-ended so teachers can tailor the project to the topics they are studying and/or the equipment they have available.
This lesson plan was developed as part of a collaborative professional project with the American Library Association Office for Information Technology Policy and the American Association of School Librarians (AASL).
Featured Resources
Multimedia Project Planning Sheet: Students can use this sheet to plan the topic, purpose, tools, and format for any multimedia project.
Image and Sound Organizer: This printout guides students in identifying multimedia components needed for any project and tracking the location and copyright status of possible resources.
Multimedia Tools and Tutorials: This handout lists online tutorials for several types of multimedia.
From Theory to Practice
Depending on how they are used, multimedia projects can provide a motivation for learning or an alternative to traditional assessment that can be very meaningful and engaging to today's media-savvy students. These projects can encourage teamwork and cooperation and offer an outlet for student creativity, while also arming students to critically engage with multimodal texts in authentic situations. In order to be most effective, multimedia projects must be presented to students in a way that not only engages their interest in technology but also enhances their critical understanding and fluency with the multimedia genre and the many modes of text that can be incorporated. NCTE's Statement on Multimodal Literacies suggests that "From an early age, students are very sophisticated readers and producers of multimodal work. They can be helped to understand how these works make meaning, how they are based on conventions, and how they are created for and respond to specific communities or audiences." This lesson therefore engages students in thinking critically about multimedia not only through the analysis of online examples but also by challenging them to choose appropriate formats and modes of text to craft a presentation that suits their own purpose and audience.
Further Reading
Common Core Standards
This resource has been aligned to the Common Core State Standards for states in which they have been adopted. If a state does not appear in the drop-down, CCSS alignments are forthcoming.
State Standards
This lesson has been aligned to standards in the following states. If a state does not appear in the drop-down, standard alignments are not currently available for that state.
NCTE/IRA National Standards for the English Language Arts
- 1. Students read a wide range of print and nonprint texts to build an understanding of texts, of themselves, and of the cultures of the United States and the world; to acquire new information; to respond to the needs and demands of society and the workplace; and for personal fulfillment. Among these texts are fiction and nonfiction, classic and contemporary works.
- 4. Students adjust their use of spoken, written, and visual language (e.g., conventions, style, vocabulary) to communicate effectively with a variety of audiences and for different purposes.
- 5. Students employ a wide range of strategies as they write and use different writing process elements appropriately to communicate with different audiences for a variety of purposes.
- 11. Students participate as knowledgeable, reflective, creative, and critical members of a variety of literacy communities.
- 12. Students use spoken, written, and visual language to accomplish their own purposes (e.g., for learning, enjoyment, persuasion, and the exchange of information).
Materials and Technology
Projector for showing a Website (optional)
Printouts
Websites
Preparation
- This lesson is designed to be co-planned and co-taught by the classroom teacher and the school library media specialist. Meet to decide responsibilities for teaching the lessons and assessing student work, as well as to arrange logistics for using the library media center.
- The student work in this lesson depends on background knowledge about copyright law and fair use. The classroom teacher and school library media specialist should together adapt materials and activities from Students as Creators: Exploring Copyright to support students in this lesson.
- Prepare one copy of the Multimedia Project Assignment, Multimedia Project Planning Sheet, and Multimedia Tools and Tutorials handout for each group.
- Prepare several copies of the Image and Sound Organizer and Multimedia Project Storyboard handouts for each group.
- Prepare one copy of the Peer Review handout for each student.
- The classroom teacher and school library media specialist should familiarize themselves with multimedia tools available at school, including computer presentation, photo, sound, video, and drawing programs; video equipment; cameras and other photography equipment; scanners; etc. If necessary, arrange to use this equipment as needed in Sessions Three - Nine.
- Review the pertinent tools and tutorials from the Multimedia Tools and Tutorials handout or Web page, and select the ones that will work best for your students and the available equipment.
- If not already familiar with posting work to the school Website, the classroom teacher and school library media specialist should become familiar with this process. Alternatively, prepare for recording students' finished products on CD.
- Test the ReadWriteThink Flip Book and ReadWriteThink Multimedia Analysis Chart on your computers to become familiar with the tools and ensure that have the Flash plug-in is installed. Schools can download the plug-in from the technical support page.
Student Objectives
Students will
- analyze an online multimedia presentation to identify characteristics of the genre.
- identify modes of text that are most effective for their audience and purpose.
- create an original multimedia presentation.
Note: In addition to the stated NCTE/IRA standards, this lesson is also aligned to the following American Association of School Librarians Standards for the 21st-Century Learner.
- 1. Inquire, think critically, and gain knowledge
- Respect copyright/intellectual property rights of creators and producers.
- Follow ethical and legal guidelines in gathering and using information
- Respect copyright/intellectual property rights of creators and producers.
- 3. Share knowledge and participate ethically and productively as members of our democratic society
- Use information and technology ethically and responsibly.
- Respect the principles of intellectual freedom.
- Use information and technology ethically and responsibly.
Session One
- Ask students what the term multimedia means to them. Students should understand that multimedia means that something is made up of more than one medium, such as images, video, animation, sound, text, and graphics such as charts or graphs. Multimedia in the Classroom provides a good definition and examples of multimedia that can be shared with the class.
- Ask students to suggest some purposes for creating a multimedia work. Suggestions may include expressing oneself artistically, conveying information about a place or topic, and persuading someone to do something.
- Open the ARTSEDGE resource Blues Journey. Share this resource with students using a projector, or have students access it and follow along on individual or group computers.
- View the intro screen with students, and co-facilitate an analysis of the resource as a class by asking questions such as the following:
- What is the purpose of this screen?
- What types of media are used on this screen?
- Which type of media makes the biggest impact? Why?
- How has color been used to convey the message of this multimedia work?
- How have images been used? How do these images contribute to the message conveyed?
- How is text used on this screen?
- How many different fonts are used? Why might different fonts have been selected rather than one?
- What style are the fonts (e.g., simple, gimmicky/fun, scripted/elaborate). How does this style contribute to the feel of the whole screen? How does it relate to the purpose of the text?
- What is the purpose of this screen?
- Click the signpost for "The Music." Analyze this screen using the following questions:
- How does this multimedia work transition from one screen to the next?
- What is the purpose of this screen?
- How is this screen similar to the first screen? How is it different?
- What additional media are used on this second screen?
- How does this multimedia work transition from one screen to the next?
- Continue through the remainder of the "The Music" portion of the resource. The screens are largely similar in design, so you can discuss questions such as the following as students view any of the screens:
- What is the purpose of this multimedia work as a whole?
- Is all the information given on this screen available directly on the screen? Why not?
- What items make the biggest impact on this screen? Why?
- What font color is used? Is this a good choice? Why was it likely selected?
- Is the resource easy to read? Why or why not?
- How does the audio contribute to the resource? Is it essential or just "background noise"?
- How do the images contribute to the resource? Are they essential? Why or why not?
- Why might the images have been selected?
- What do the images on all the screens have in common? How might this contribute to the message the resource is trying to convey?
- What are the common elements found on most screens? How do these help the reader?
- Which type of media (text, images, audio) takes up the most space on the screen? Why might the designer have done this?
- Which items are most effective? Which are least effective? Why?
- What is the purpose of this multimedia work as a whole?
- After viewing the entire resource, brainstorm a list of characteristics of multimedia resources based on the resource you viewed as well as students' prior knowledge.
- Have students work in groups to choose and view two to three additional examples from the collections of multimedia resources listed below. They should jot down any additional characteristics of multimedia resources they note. They also should note specific examples of techniques or ideas they particularly like or that they thought did not work well. They can use the ReadWriteThink Multimedia Analysis Chart to keep track of these items.
- National Geographic Sights and Sounds features (Note: This is not a section of the site, but rather a search landing page for all multimedia content from National Geographic.)
- ARTSEDGE Multimedia Finder
- PBS Cyber ads from the 2004 Presidential elections
- National Geographic Sights and Sounds features (Note: This is not a section of the site, but rather a search landing page for all multimedia content from National Geographic.)
- After students have viewed the resources, have each group share additional characteristics they identified with the class. Add those characteristics to the initial brainstorming list.
- Ask students to share their favorite examples of a use of multimedia that they felt was particularly powerful or one that did not work well.
- Keep the class notes accessible to students, and encourage them to keep their own notes as well for reference when they create an original multimedia work in the following sessions.
Session Two
- Explain that students will be working in groups to design and create an original, publishable multimedia work over the next two weeks.
- Brainstorm some programs or tools students could use to create a multimedia work, and list them on the board. The list could include PowerPoint, Keynote, or other presentation programs; a digital camera; a video camera; a sound recorder; photo-editing software (most computers have basic photo-editing software included); Web page-creating software (note that Microsoft Word can be used to create Web pages); drawing programs, such as Paint; images or sound from other sources, such as the Web; etc.
- Arrange the class into groups of 3-4 students. For this project, it might be useful to let students, with approval, self-select groups with common interests.
- Give each group a copy of the Multimedia Project Assignment and the Multimedia Project Planning Sheet, and explain the assignment to students:
- The group must create a multimedia work that it can present to the class. The work can be on a topic and in a format of the group's choice. Note that this part can be adapted if desired to focus students on a particular topic that is relevant to your classroom and/or with a more limited choice of formats.
- Each work must integrate at least two of the following forms of media: images, video, sound, animation, text, graphics.
- The presentation of the work must last between one and five minutes.
- The work must respect copyright law.
- The group must create a multimedia work that it can present to the class. The work can be on a topic and in a format of the group's choice. Note that this part can be adapted if desired to focus students on a particular topic that is relevant to your classroom and/or with a more limited choice of formats.
- Explain to students that they will be given information and tools that will help them make sure their works uphold and conform to copyright law, as well as tutorials to help them use various multimedia programs.
- Brainstorm some examples of what a group's finished multimedia project might look like. For example, it might be a Web page with links and images, a PowerPoint presentation with photographs and music, a slide show with sound, a video with sound, an animation with sound, etc. Be sure to point out which basic options, such as slide shows, video, etc., will be possible for students to create using school resources.
- Allow students time to discuss within their groups the kind of projects they want to create and the topics they want to cover. Students can use the Multimedia Project Planning Sheet to create basic plans for their projects.
- Collect the planning sheets. The classroom teacher and school library media specialist should review them prior to the next session. Alternatively, the classroom teacher and school library media specialist can meet with each group briefly to discuss its plan. It is important at this stage to make sure that every group has a good topic with which all members are comfortable, as well as an appropriate format selected in which to create the project.
Session Three
- Return the planning sheets with combined comments to the groups. Ask them to make any necessary adjustments to their basic plans based on the comments. Meet with groups briefly as necessary to make sure they are ready to proceed to the next step.
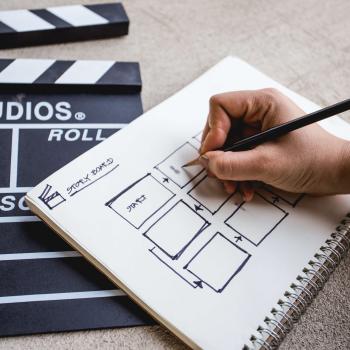
- Give each group a Multimedia Project Storyboard. Alternatively, give students access to the ReadWriteThink Flip Book, which can be used to create a storyboard, with each page as a panel. Demonstrate how to use the storyboard to sketch each step of the project. The use of storyboards will differ slightly depending on which format students are using. For example, if they are using PowerPoint, each frame on the storyboard would represent one slide. If they are using video, each panel would describe a shot in the video (e.g., students walking into the classroom laughing and talking [five seconds]). If they are focusing on sound, with supporting images or graphics, each panel would list the text or sound and describe related images, as appropriate.
- Give students time in class to begin sketching their projects using the storyboard. They should include a rough draft of any text, describe or sketch the kinds of images or video they will use, and note ideas for sound or types of sounds they want to include (e.g., bird call, spooky music, or chorus of _____ song).
- If students are using the ReadWriteThink Flip Book, make sure they print their work before closing the interactive.
Session Four
- Allow time for students to finish their initial, rough storyboards. As students work, the classroom teacher and school library media specialist should briefly visit the groups to check their storyboards.
- When students have completed their rough storyboards, gather them together to discuss the next step. Explain that they will next search for or create particular images, sounds, and other resources that they can use in their presentations.
- Review the rules for use of copyrighted material with students, using the Students as Creators: Exploring Copyright lesson plan. Explain that students will need to follow copyright rules when selecting images, sounds, and other resources for their presentations. The lesson plan includes a list of Online Sources for Finding Works in the Public Domain, which may be useful to students.
- Explain that students may choose to create some of their own images and sound. Students may create images or art using standard materials, such as paint, collage materials, drawing materials, etc., that then can be digitized using a scanner or digital camera. They also may take photographs or create images using a computer drawing program, such as Paint. They can record sound using a microphone and the recording tools available with most computers. If students are not familiar with the available drawing programs and/or sound programs, they may need a brief tutorial before continuing with the project. The Multimedia Tools and Tutorials list includes links to a number of useful resources for the creation of sound, image, animation, and video.
- Students should use any remaining time to begin finding and/or creating sound and images for their presentations. They should use the Image and Sound Organizer to track where each item was found. They will continue with this process in the next session.
Session Five
- Give students time to continue finding and/or creating images and sounds for their presentations. As students work, visit with each group to check that students are selecting appropriate resources. If groups are unable to find resources as described on their storyboards, they will need to form an alternative plan.
- After finding the images, sounds, and other resources for their presentations, students should revisit their storyboards. They will need to revise them to include the specific sounds, images, video, etc. that they selected. They may also need to revise their text or make more substantial revisions to adjust for the actual elements they found.
- Students may need additional time outside class to complete their storyboards. In any case, groups should turn in their storyboards for review by the teacher and school library media specialist prior to the next session.
Session Six
- Return to the groups the storyboards with any comments. Allow students a few minutes to revise their storyboards if needed before continuing.
- Explain that students will now use various tools available to them to create a multimedia work based on their storyboards.
- Give a brief overview of the programs and materials available in your classroom or school for their use.
- Allow groups time to discuss which tools they want to use and to spend time familiarizing themselves with those tools. Depending on the number of students, the amount of resources available, and the technical knowledge of the students, consider creating a sign-up sheet for training and use of some of the tools. The school library media specialist may be able to identify student "experts" who are familiar with some of the tools and programs available and can assist their peers, and/or direct students to online tutorials for their programs. A number of tutorial options are listed on the Multimedia Tools and Tutorials handout or Web page.
- As students become familiar with the necessary tools, they can begin to create the multimedia work outlined on their storyboards.
Session Seven
- Allow students to continue working on their multimedia projects during this session.
- Visit with groups as they work to make sure they are able to use the desired programs or tools and that they are considering copyright concerns as they incorporate material into their presentations.
- The classroom teacher, school library media specialist, and/or student "experts" should be available to help with any technical problems that may arise as students work.
- Because of the variety of approaches possible to this project, some students may finish early, while others may need additional time outside class to complete their projects. Plan for alternative activities for those who finish early, and be prepared to delay the final three sessions if needed to give students additional time outside class to finish their projects.
Session Eight
- Allow students to complete any finishing touches to their projects during the first half of the session.
- Have students use the rest of the session to test and troubleshoot their projects, using the actual equipment that will be available during their presentation, if possible.
- Students should be prepared to share their completed projects with the class during the next session.
Session Nine
- In this session, each group should present its multimedia work to the class. Allow time for each group to explain its project briefly and to answer any questions their classmates may have.
- Ask student audience members to peer review each presentation using the Multimedia Peer Review handout. Encourage students to be constructive in their comments so as to help the group refine its work before it is published.
- The classroom teacher and school library media specialist should co-facilitate a brief discussion each project after it is presented. Ask the audience to share specific elements they liked and offer specific suggestions for improvement prior to publication. The classroom teacher and school library media specialist should share comments and suggestions with each group.
Session Ten
- Groups should refine their projects based on the reviews they were given in the previous session.
- Work with students as needed to publish their work on a school Website or on CD.
Extensions
- Tie the multimedia project to a content-area research project and use it as an alternative assessment of students' learning.
- Collaborate with music and art teachers to have students create a multimedia project showcasing their own music, art, and/or creative writing.
- Tie the multimedia project in with literature you are reading in class. Help students relate the literature to their own lives by selecting an "inspiration point" from the literature and creating a multimedia work to celebrate that inspiration or to convince or inspire others. This activity could be very effective with English Language Learners.
- Have students create a multimedia presentation to advocate for a cause that is important to them. Explore the effectiveness of multimedia for persuasive writing.
Student Assessment / Reflections
- The classroom teacher and school library media specialist should each observe students during the process of planning and creating their projects to assess their contributions to the group work and their understanding of the tools they use.
- The classroom teacher and school library media specialist should together assess the planning process using the completed group copies of the Multimedia Project Planning Sheet, Image and Sound Organizer, and Multimedia Project Storyboard.
- Using the guidelines covered in the Multimedia Project Assignment, the classroom teacher and school library media specialist should assess the final project.
Add new comment