Great American Inventors: Using Nonfiction to Learn About Technology Inventions
- Preview |
- Standards |
- Resources & Preparation |
- Instructional Plan |
- Related Resources |
- Comments
Overview
Students use technology every day, but do they ever stop and wonder about the inventors who made certain technology possible? This lesson encourages students to investigate three American inventors-Alexander Graham Bell, George Washington Carver, and Stephanie Kwolek-through research and readings of their biographies. Reading biographies about famous inventors can bring enthusiasm and a sense of exploration to your classroom. To begin this lesson, students are divided into three research groups, and each group is assigned a different inventor. As students read, gather, and present information about Bell, Carver, and Kwolek, they learn how this trio's inventions changed and shaped America's past and influenced the future of technology. Further, students examine how the inventions directly impact their own lives.
Featured Resources
Venn Diagram: Students can use this interactive to help them compare and contrast Alexander Graham Bell, George Washington Carver, and Stephanie Kwolek.
From Theory to Practice
Based on "Nonfiction as Literature: An Untapped Goldmine," this lesson focuses on the importance of introducing and extending the use of nonfiction text outside the parameters of the science and history classroom. According to the authors of the article, nonfiction text has evolved over the past several years. Writers of nonfiction text have become intriguing with their words, and illustrators/photographers have developed ways to capture the essence of their topics.
The following is a list of key concepts gleaned from the article:
- Importance of using nonfiction text with creative formats and designs
- Necessity of incorporating nonfiction text of various reading levels
- Availability of nonfiction text for all reading levels
- Effect of nonfiction text on students' curiosity and their future desire to explore other nonfiction text
Common Core Standards
This resource has been aligned to the Common Core State Standards for states in which they have been adopted. If a state does not appear in the drop-down, CCSS alignments are forthcoming.
State Standards
This lesson has been aligned to standards in the following states. If a state does not appear in the drop-down, standard alignments are not currently available for that state.
NCTE/IRA National Standards for the English Language Arts
- 1. Students read a wide range of print and nonprint texts to build an understanding of texts, of themselves, and of the cultures of the United States and the world; to acquire new information; to respond to the needs and demands of society and the workplace; and for personal fulfillment. Among these texts are fiction and nonfiction, classic and contemporary works.
- 3. Students apply a wide range of strategies to comprehend, interpret, evaluate, and appreciate texts. They draw on their prior experience, their interactions with other readers and writers, their knowledge of word meaning and of other texts, their word identification strategies, and their understanding of textual features (e.g., sound-letter correspondence, sentence structure, context, graphics).
- 4. Students adjust their use of spoken, written, and visual language (e.g., conventions, style, vocabulary) to communicate effectively with a variety of audiences and for different purposes.
- 7. Students conduct research on issues and interests by generating ideas and questions, and by posing problems. They gather, evaluate, and synthesize data from a variety of sources (e.g., print and nonprint texts, artifacts, people) to communicate their discoveries in ways that suit their purpose and audience.
- 8. Students use a variety of technological and information resources (e.g., libraries, databases, computer networks, video) to gather and synthesize information and to create and communicate knowledge.
- 12. Students use spoken, written, and visual language to accomplish their own purposes (e.g., for learning, enjoyment, persuasion, and the exchange of information).
Materials and Technology
- One large photograph of Alexander Graham Bell, George Washington Carver, and Stephanie Kwolek
- Biographies of the Selected Inventors
- Popsicle sticks labeled with each student's name
- One hat and three strips of paper labeled with the names of the inventors
- Three boxes labeled with the names of the inventors
- Three sets of task buttons
- Chart paper and markers
- White board
- Computers with Internet access
- PowerPoint software
- Projection hardware and screen
- Three large hula hoops of different colors
- Writing journals
- A telephone, jar of peanut butter, and bulletproof vest (or pictures of these items)
Printouts
Websites
Preparation
| 1. | Review the Web Resources for the Selected Inventors. As you are reviewing the websites:
|
| 2. | Print and enlarge pictures of Alexander Graham Bell, George Washington Carver, and Stephanie Kwolek, and post them on the board before Session 1. |
| 3. | Locate and read the recommended Biographies of the Selected Inventors: Alexander Graham Bell, George Washington Carver, and Stephanie Kwolek. (Note: Other biographies on these inventors may be substituted, but it is best to gather at least three to four biographies for each inventor and to ensure that the biographies are at the appropriate reading level for your students.) |
| 4. | Write each student's name on a popsicle stick. |
| 5. | Have slips of paper with Alexander Graham Bell, George Washington Carver, and Stephanie Kwolek written on them. Place the slips in a hat. |
| 6. | Create three sets of task buttons with the following labels:
|
| 7. | Compile a box of materials for each inventor containing three to four biographies about the inventor, all of the student handouts (see Resources) a complete set of task buttons, and the Web addresses for the inventor. During Session 1, students will be arranged in three groups, with each group receiving a box of materials for their assigned inventor. Have chart paper and markers also available for each group. |
| 8. | This lesson requires students to create a PowerPoint presentation. PowerPoint in the Classroom may serve as a useful Web resource for both teachers and students who are unfamiliar with this program. Teaching students how to create a slide show prior to the lesson will save time and allow students to focus more attention on the content of the lesson. |
| 9. | Before Session 3, review the Venn Diagram interactive tool and ensure that you have a computer with Internet access hooked up to a projection screen. In addition, gather three large hula hoops and have at least one posted note available for each student. |
Student Objectives
Students will
- Work collaboratively in small groups to research and gather important information about an inventor and his or her inventions by reading biographies and accessing online resources
- Synthesize researched information into a PowerPoint slide show, and develop oral presentation skills by presenting the slide show to the class
- Compare the three inventors using a 3-circle Venn diagram
- Examine how inventions of the past have impacted their own lives and the global community
Session 1
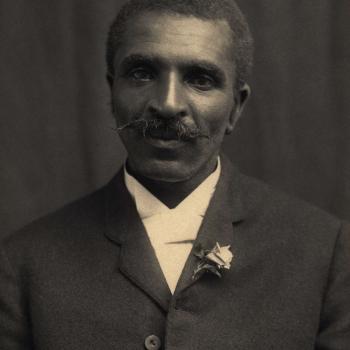
| 1. | Gather students in a large semicircle facing the white board. Show students a telephone, a bulletproof vest, and a jar of peanut butter (or pictures of these items). Ask students if they know who invented each item. After a brief discussion, tell students to look at the three portraits posted on the board (see Preparation, Step 2). If students are not able to identify the inventors by item or portrait, introduce them and explain that Alexander Graham Bell invented the telephone, George Washington Carver invented hundreds of uses for the peanut and is known for popularizing peanut butter, and Stephanie Kwolek invented Kevlar, which is used to make bulletproof vests. |
| 2. | Tell students that they are going to be using biographical information to help them learn more about these three inventors and how their inventions helped to change the technology we use today. Show the biographies that you selected for each inventor, explaining how you found them to be interesting to read and to also include a wealth of information about the inventors. |
| 3. | Tell students that they are going to be divided into three investigational groups by pulling popsicle sticks. Once everyone has settled into their groups, have one person from each group draw an inventor's name from the hat (see Preparation, Step 5). The three students will then return to their groups to share their assigned inventor. |
| 4. | Give each group the box of materials that you compiled for their assigned inventor (see Preparation, Step 7). Explain to students that inside the box they will find several biographies, a few Web addresses to visit, a set of task buttons, an instruction sheet defining their task, and three evaluation forms. |
| 5. | Review the Biography Instruction Sheet with students, making sure that they understand the task and what it involves. |
| 6. | Review the three evaluation forms: Inventors PowerPoint Rubric, Oral Presentation Rubric, and Inventors Comparison Checklist. Explain to students that as they are working, they should refer to the evaluation forms to ensure that they are meeting the project's requirements. |
| 7. | Review the six task buttons, which indicate specialized jobs for group members (see Preparation, Step 6). Ask each group to decide who in the group will be responsible for each job. |
| 8. | Since each box of materials contains three to four biographies, ask students to divide into minigroups of two or three students each. Each minigroup can then work together to read one of the biographies about the inventor and also access the Web addresses to find more information. As they are reading, students should be taking detailed notes in their journals. Remind students that they need to collect information on the inventor, as well as information about how his or her invention used technology to change the world. |
| 9. | Minigroups will need to be prepared to share the information they have gathered from their readings with their full group in the next session. |
Session 2
| 1. | Instruct students to gather in their investigational groups. |
| 2. | Begin by allowing each minigroup to share their findings within their group. After these minigroup presentations, the group should then discuss, compile, and create a working chart to display the most important findings. Suggest to students that charts include the following categories:
|
| 3. | Refer students to the Biography Instruction Sheet to find the criteria for creating their PowerPoint slide show (see Step 4). Review this information together. |
| 4. | Allow time in class for students to work on their slide shows (and encourage students to work on them during free time also). |
Session 3
| 1. | Allow each group adequate time to present their research on their assigned inventor orally and visually using their PowerPoint slide show. Prompt the audience to write questions they have about the inventor or new information they learned from the presentation. Conduct a whole-class discussion based on these responses from the audience. |
| 2. | After the presentations, have students form a large circle in the center of the room. Explain that you would like students to compare the three inventors using a 3-circle Venn diagram. |
| 3. | Lay out the three large hula hoops in the shape of a 3-circle Venn diagram, and ask students to create appropriate labels for each section of the diagram. At the same time, project the online Venn Diagram interactive tool on a large screen for the whole class to see (see Preparation, Step 9). |
| 4. | Pass out at least one posted note to each student in the class. Have each students write a fact about one of the three inventors on the posted note. |
| 5. | Invite a student volunteer to share his or her fact and place the posted note in the correct section of the 3-circle Venn diagram. Have the class discuss the fact to decide if it is located in the correct section of the Venn diagram.
|
| 6. | After determining the fact's placement, add it to the online 3-circle Venn diagram that is projected on the screen. |
| 7. | Continue this process until everyone has had the opportunity to share a fact about the inventors and add it to the proper section of the Venn diagram. Print the completed online Venn diagram before closing the program and make enough copies to distribute to students to use as a review of the facts they learned about the inventors. |
| 8. | While students are still seated in a circle on the rug, ask them to look again at the portraits of the three inventors posted on the board. Ask for volunteers to correctly identify each inventor and his or her inventions. Then ask each student to share one way these inventions of the past have impacted his or her life today. |
Extensions
- Have students locate and explore other websites on these inventors to find additional information about their inventions.
- Take students to the school library to find additional resources on these inventors.
- Follow the same lesson format with three different inventors. This time after the group presentations in Session 3, allow students to work individually, with a partner, or with their investigational groups to use the Venn Diagram interactive tool to compare the inventors. The printed Venn diagram can be used for evaluation purposes.
- Access other ReadWriteThink.org lessons that incorporate the use of biographies to further students' exposure to this type of nonfiction text:
- Have students create a Bio-Cube for each of the three inventors that they studied. This tool requires students to summarize the most important information about a person to fit on a printout that they can then fold into a cube.
Student Assessment / Reflections
- Observe students' participation throughout the lesson:
- Did students take detailed notes while reading the biographies and accessing the websites?
- Did students make connections between inventions and technology?
- Did students make connections between technology and the global community?
- Did students lead intelligent discussions in their groups using information found in the biographies?
- Did students successfully compile and create a working chart about their inventor and his or her inventions?
- Did students take detailed notes while reading the biographies and accessing the websites?
- Use the following evaluation forms to assess students' completed work:
Add new comment